VPN provides an encrypted server and hides your IP address from corporations, government agencies, and would-be hackers. A VPN protects your identity even if you are using public or shared Wi-Fi, and your data will be kept private from any prying internet eyes.
Before we configure our OpenVPN server, we need to choose an authentication method. Both OpenVPN and Pfsense support password-based authentication, certificate-based authentication, or both. Here we use certificate-based authentication. So, for that, we need to generate a Certificate Authority as well as a server certificate.
1. Generating a CA Certificate:
The first thing we need to do is generate our Certificate Authority (CA), which will validate the OpenVPN server’s identity and authenticate user certificates (if enabled).
1.1 System > Cert. Manager > Add
Descriptive name: Test
Fill in the Details on the page as shown in the screenshot below:
Method: Create an internal Certificate Authority.
Key type: RSA
Key length: 4096
Digest Algorithm: sha512
Common Name: Choose a Common Name for your certificate or leave the default of internal-ca.

Click on ‘Save’.
You’ve created your Certificate Authority.


2. Generating a Server Certificate:
2.1 Go to System > Cert. Manager > Certificate (Sub Menu) > ADD

2.2 Fill required details on the page:
Method: Create an internal Certificate.
Descriptive name: Test
Use the same values you set for the Certificate Authority for the Key type and length, as well as for the Digest Algorithm.
Lifetime: 365 days
Certificate Type: Server Certificate

3. Create your OpenVPN user and your user certificate
3.1 Go to System > User Manager
We now need to create a user to access the OpenVPN server. I will be creating a single user for this guide, but you can create as many users as you need. Simply repeat these steps.

If you chose to set up your server for certificate-based authentication or for certificate and password-based authentication, click the pencil icon to the right of your new user. You’ll be taken back to the Edit User window.


Click the Add button under User Certificates. You’ll be taken to the Certificate Manager, and prompted to input the parameters for your user certificate.

4. Creating OpenVPN Server:
4.1 VPN > OpenVPN
Set the below information into their respective field as shown in the screenshot:
Description: Test
Server mode: Remote Access (SSL/TLS + User Auth)

Cryptographic Setting:
Use a TLS Key and Automatically generate a TLS Key are enabled.
Peer Certificate Authority: Test (we have created earlier)
Server certificate: the server certificate we created earlier.
DH Parameter : 4096
Auth digest algorithm: SHA512 (512-bit).

Tunnel Setting:
In the IPv4 Tunnel Network field, enter a subnet that is not present on your network to be used as the OpenVPN network’s internal subnet. I’m using 10.100.100.0/24/24.
Enable Redirect IPv4 Gateway to route all IPv4 traffic over the VPN tunnel.

In Advance Setting, enable UDP Fast I/O.
If you’re only using IPv4, select IPv4 only in the Gateway creation field.
Click on ‘Save’.
Verifying the OpenVPN server configuration
Status > System Logs > OpenVPN
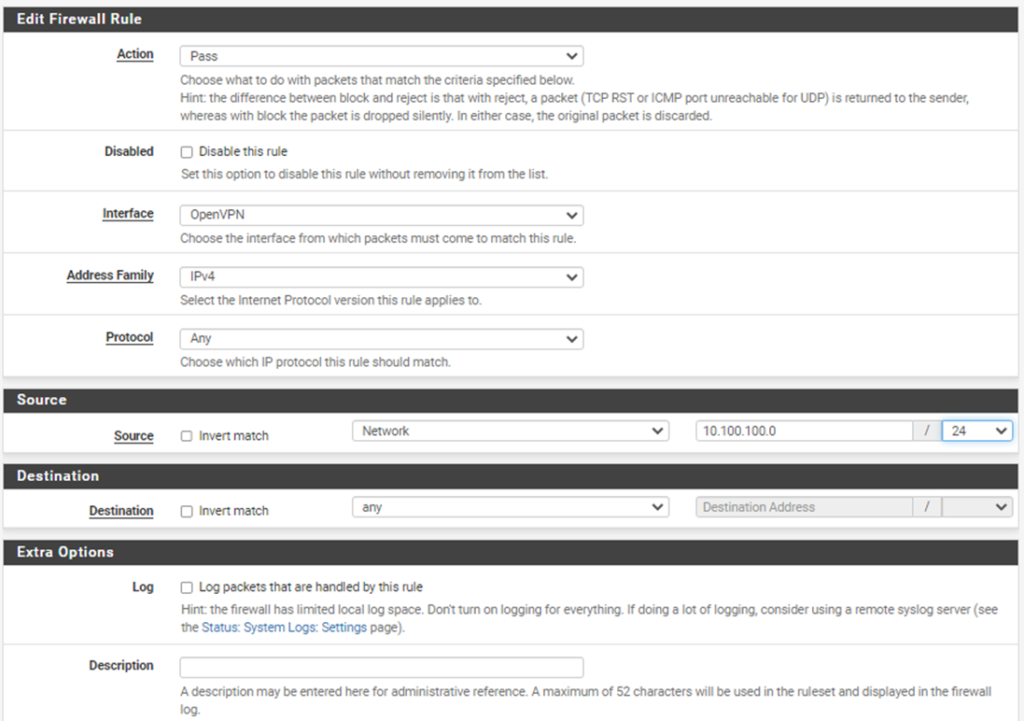
5. Create Firewall Rules:
5.1 Firewall > Rules > OpenVPN

Set below information into their respective field:
Action: Pass
Interface: OpenVPN
Address Family: IPv4.
Protocol: Any.
Source: Network (OpenVPN subnet you specified earlier. For example: 10.100.100.0/24

5.2 Wan Rule
To connect to your OpenVPN server from the outside world (i.e., the internet), you’re going to need to open the port your server runs on (1194, in this example) on your WAN interface. This rule will allow your client to connect to your OpenVPN server from the internet.
Firewall > Rules > WAN
Action: Pass
Interface: WAN
Address Family: IPv4.
Protocol: UDP.
Source: any
Destination: WAN Address
Destination Port Range : Other (1194)


6. Install the OpenVPN Client Export Utility:
We need to install the package from the pfSense Package Manager manually.
Go to System > Package Manager > Available Packages
Install openvpn-client-export
As it was already installed, it’s shown in Installed Packages.

7. Export the OpenVPN client Configuration:
VPN > OPEN VPN > client Export > scroll down > OpenVPN client


