In today’s fast-paced and linked world, data replication is critical for organizations to maintain data availability and reliability. DFS Replication (DFSR) is a powerful technique for efficient replication. Using DFSR, businesses may effectively distribute and synchronize files across several servers, increasing data redundancy and promoting seamless collaboration. In this blog article, we will walk you through setting up DFS Replication, giving step-by-step instructions and helpful insights to help you realize the full potential of this strong replication technique.
DFS Replication is a highly effective replication engine that allows for the synchronization of folders across multiple servers, even when connected by limited bandwidth network connections. It has replaced the File Replication Service (FRS) as the replication engine for DFS Namespaces. It is a robust solution for maintaining data consistency and availability in distributed computing environments.
DFS Setup
To proceed with our requirements, we must prepare at least two servers for the task at hand. As a first step, we must enable DFS roles in the servers. To do so, please follow these steps:
Launch Server Manager and select “Add roles and features.”
Choose “Role-based installation” or “Feature-based installation,” depending on your specific requirements.
Select “DFS namespace” and “DFS replication” as the roles to be installed.
By following these steps, you can enable the necessary DFS roles on your servers and proceed with the task at hand.

Once the installation process has been completed, we must create a shared folder on a server that is part of the domain. In our case, we have created the shared folder on our Domain Controller. To create a shared folder, please follow these steps:
- Right-click on the folder you want to share and select “Properties.”
- Click on the “Sharing” tab.
- Select “Domain users” to share the folder with all users in the domain.
- Set appropriate permissions for the shared folder by clicking the “Permissions” button.
- Finally, click “Share” to make the folder available for other users in the domain.
By following these steps, you can create a shared folder on a server that is part of the domain and make it available for use by other users in the network.
More Services blogs and Pages:
Advantages of White Label Help Desk Support for Remote Connectivity in 2023
Email Migration From G-Suite to M365

It is now shared.

Here sharing address will be – \SRV01Shared
Now, we have to create a DFS namespace to link shared folders in a namespace.
What is DFS Namespace ?
DFS Namespace is a technology in Windows Server that allows multiple shared folders across different servers to be grouped into one or more logically structured namespaces. This makes it easier for users to access shared files and resources, and enables administrators to manage distributed file resources more efficiently.
To create DFS namespace,
Open DFS management > Namespace > New Namespace.
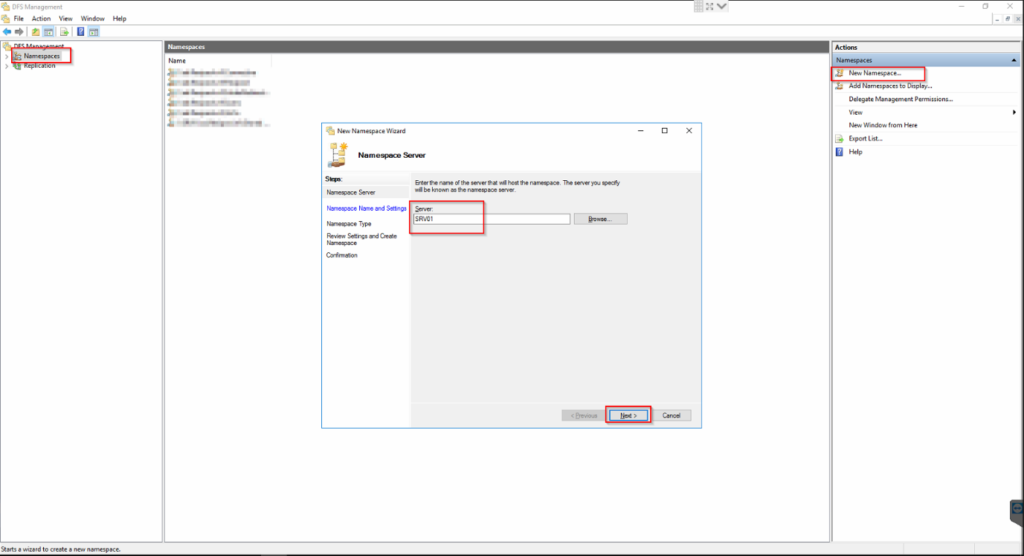
Namespace server – Enter the server name into it. If not sure, use browse option.
Click on next.

Namespace Name – Give the name to your namespace. Here I did created a test dfs for it.
Edit settings – Click on edit settings, if you want to change it’s path or configure the access permissions for users.
Then click on next.
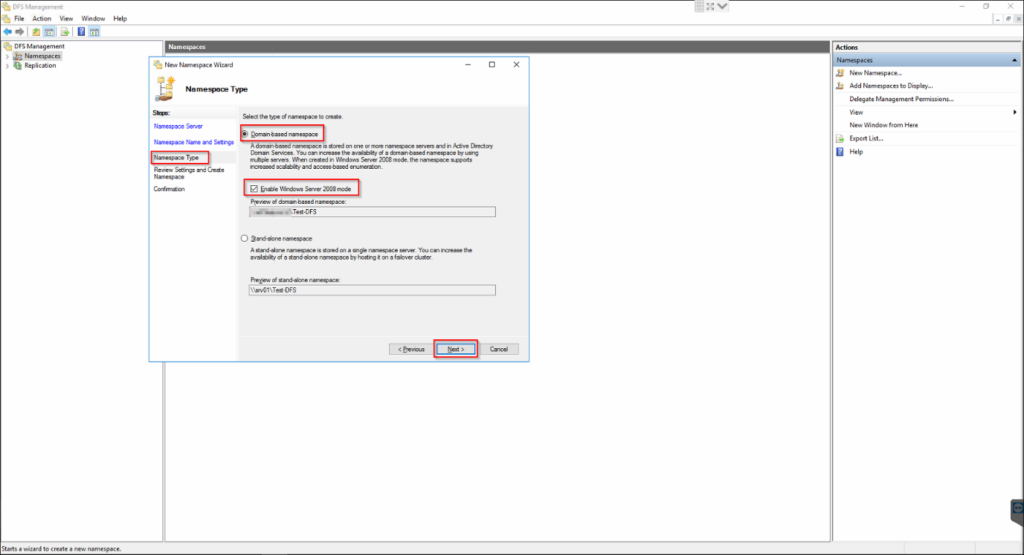
Next is – Namespace Type
Here best option to choose is Domain based namespace in windows server 2008. The advantage of it is
that it allows for a unified namespace across multiple domains and provides increased fault tolerance through automatic failover and load balancing. It also supports access-based enumeration, which allows users to only see the files and folders they have permission to access, simplifying management and improving security.

Now Review all the settings and if correct, click on create.

Now we have to add folder to namespace. We are adding it on the same server though it is applicable for all server in the domain.
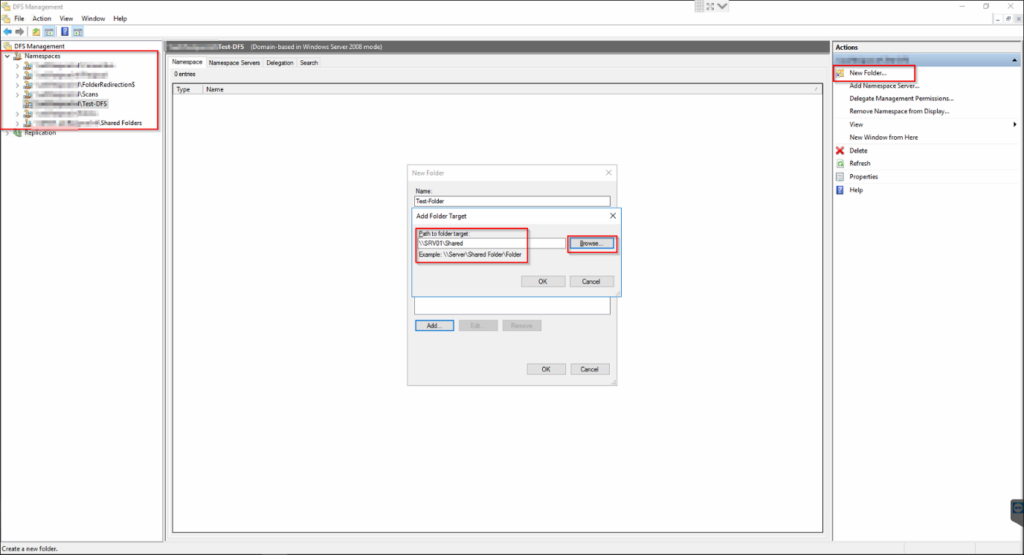
Click on OK. To save the settings, now we can access the shared folder by entering the network address in address bar.
For example it should be in this format – \DomainNameDFS-NameSpace
We need second server to replicate the data. Same as first server we need to install DFS roles and features in second server. Though we can do it same way as we did it in first server. There is option to do it via powershell commands.
Install-WindowsFeature -name “FS-DFS-Replication” -IncludeManagementTools
Install-WindowsFeature -name “FS-DFS-Namespace” -IncludeManagementTools

On second server we have to create a folder for replicated data.
This folder will be use for replication from first server’s folder.
Now share this folder same like we shared first server’s folder and give read/write permissions.
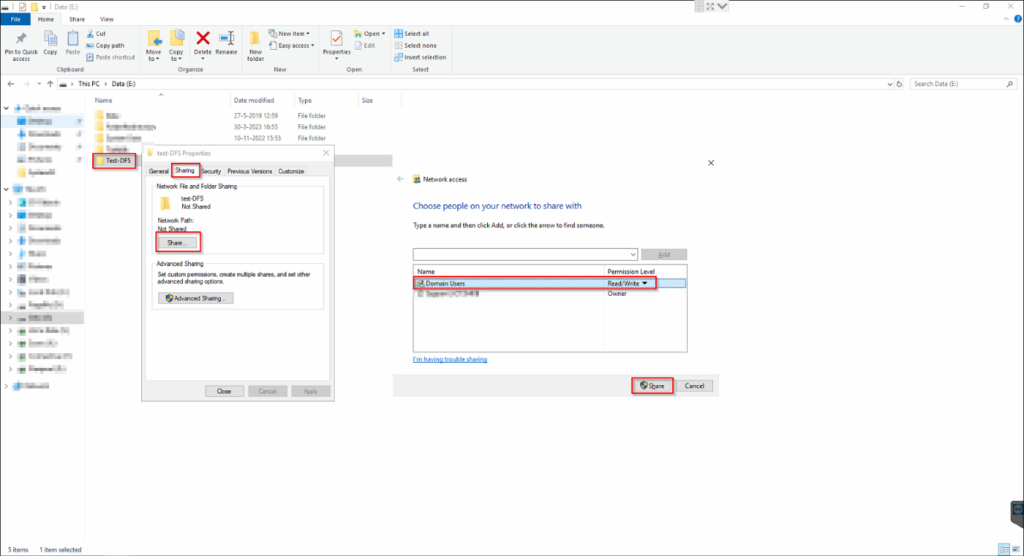
Folder is shared now.

Back to first server > Open DFS management > Select your namespace > Add Folder target > Add path of target folder > Click OK.
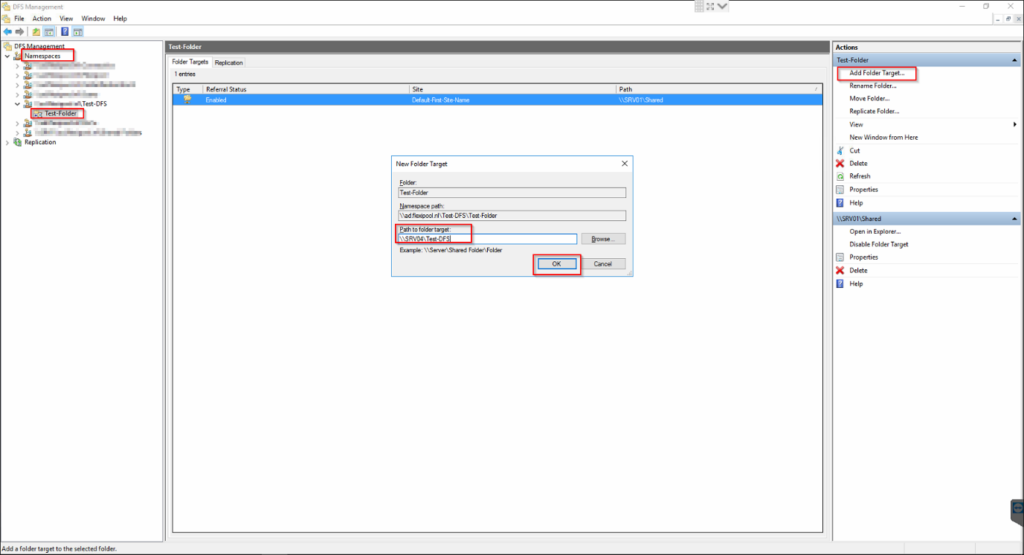
A pop-up message will occur. Click on yes.

Now Replicate folder wizard will be displayed.

Review Replication group name and Replicated folder name. And then click on next.

Review Replication Eligibility, check the paths. And Next.

Here in primary member, select the first server from which data will be replicated to other folders.

DFS topology refers to the way that DFS is designed to replicate data between servers. There are three common topologies in DFS: full mesh, no mesh, and hub and spoke.
In topology selection, select full mesh if there are fewer members. It is recommended.
No topology an be used if you want to create a custom topology.

Next one is Replication Group schedule and bandwidth, I made it for testing purpose I have given 256 Kbps. It can vary according to your purpose and requirements.
Click on Next.

Review your settings and if correct click on create.

You should see Success for all tasks as shown in the screenshot. Close it.

A delay message will occur, click on OK.
DFS has been configured successfully now.
Now Verify the Replication. Write or add a file in the network folder and see if that replicates on to another server.
