Before we delve into this, we’d like to give you a brief on what Azure Site Recovery is. Being in the IT Services Industry, it becomes very crucial for a Managed Service Provider (MSP) to adopt a well thought BCDR Strategy. BCDR stands for Business Continuity and Disaster Recovery. It is meant to keep your data safe and your work up and running causing minimal to no hindrances even when outages occur. You can set up and manage replication, failover, and failbacks. You can even replicate on-prem virtual machines.
Azure Recovery Services contributes to this strategy.
Site Recovery can manage replication for:
- Azure VMs replicating between Azure regions
- On-premises VMs, Azure Stack VMs, and physical servers
Prerequisites
Prepare on-Premises Hyper-V:
1) Review requirements and prerequisites
2) Verify your internet access. So, if you’re controlling access by an IP address, make sure that the IP address-based firewall rules can connect to Azure Datacenter IP Ranges and the HTTPS (443) port. Allow IP address ranges for the Azure region of your subscription.
3) Prepare to connect to Azure VMs after failover
We assume that you already have the following set-up in place:
- A Recovery Services Vault in the Azure portal
- A physical computer on which you want to install the configuration server
If TLS 1.0 is disabled on the computer where the configuration server is being deployed, make sure TLS 1.2 is enabled and that the.NET Framework version 4.6 or later is installed (with strong cryptography enabled).
Procedure:
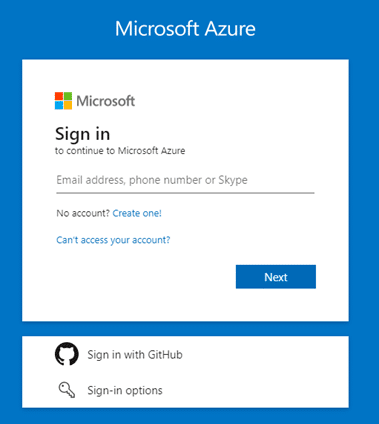
Log in to the Azure portal
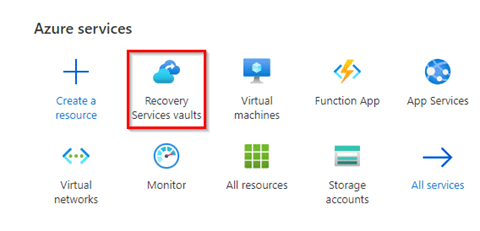
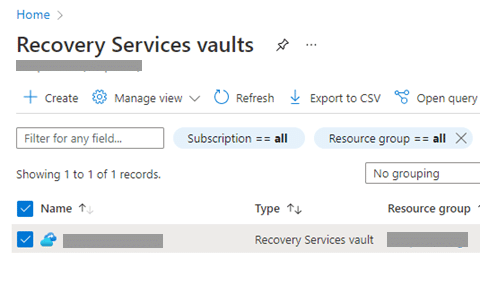
In the portal, go to the Recovery Services vaults blade and select your vault.
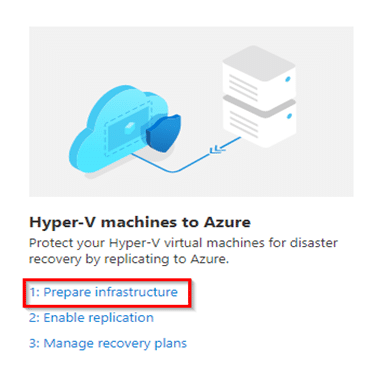
In the Resource menu of the vault, click Getting Started and scroll down to the Hyper-V machines to Azure section.
Click over Prepare infrastructure.
Check all the pre-requisites- network, storage, OS and other resources are all adequate.
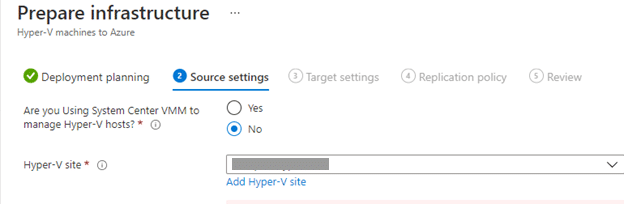
Once the minimum requirement is tested, select the “Yes, I have done it” option in the drop-down under deployment planning.
Click on Next.

On the next tab (Source Settings), select the client_HyperVsite and move ahead to the next page.
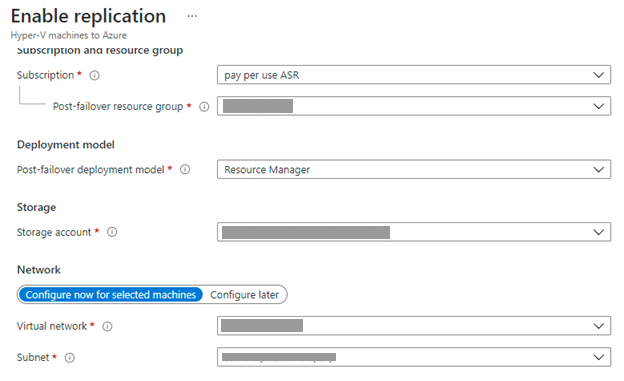
The next tab is “Target Settings”. Choose the required subscription, resource group, post-failover deployment model, storage account and network suitable for the replication. Move ahead to the next page.
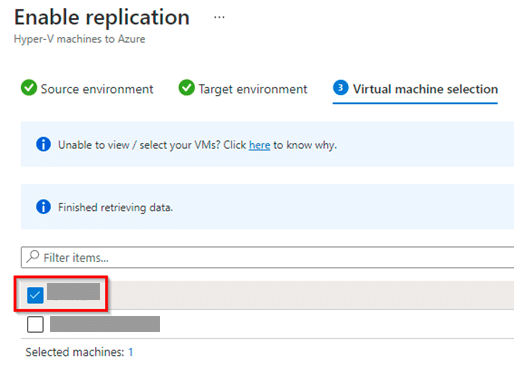
Select the Virtual machines for which you want to enable Replication.
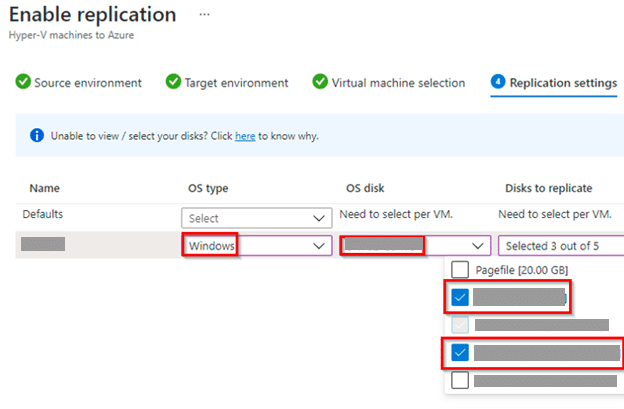
The fourth tab is Replication settings, here, select the OS type, OS disk and Disks that you want to replicate.
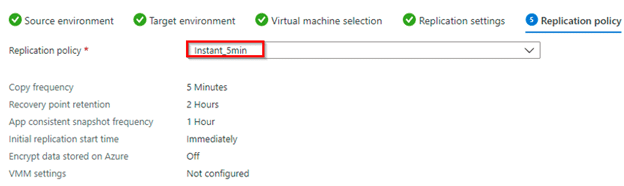
Moving next, select the Replication Policy and finally go through the summary of all the configurations.
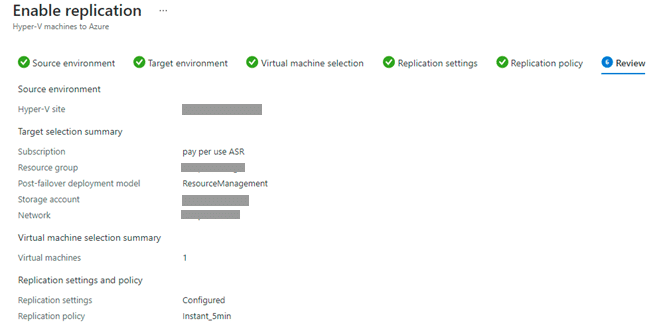
Once checked, click on Enable replication at the bottom of the window.

Once you have done that, check replication health, status, failover health and Active location in the Replicated items section of your selected vault.

Steps to Install the Provider on HyperV on-premise Server:
1) Run the setup file
2) Now in the Azure Site Recovery Setup wizard, go to Microsoft Update. Opt in to use Microsoft Update to check for any Provider updates
3) Accept the default installation location for the Provider and Agent in Installation, and then click Install.
4) After installation, in the Microsoft Azure Site Recovery Registration Wizard, go to Vault Settings, select Browse, and in Key File, select the vault key file that you downloaded
5) Specify the Azure Site Recovery subscription, the vault name, and the Hyper-V site to which the Hyper-V server belongs
Frequently Asked Questions
What is Hyper V?
Hyper-V is a hypervisor or a server virtualization tool that would allow one to create virtual computing environments. You can then manage and operate multiple OS from a single Physical Server.
What is the difference between Hyper-V and VMware?
Hyper-V and VMware both are hypervisors. Hyper-V is a virtualization tool from Microsoft and VMware is from VMware. u003cbru003eHyper-V supports Windows and Linux whereas VMware supports Windows, Unix, Linux and macOS.u003cbru003eHyper-V is suitable for smaller organizations since its cost is based on the number of cores on the host.u003cbru003eWhereas, VMware is suitable for larger organizations since it is billed on the number of CPUs.
How to disable Hyper-V?
Firstly, to know if your Hyper-V is active or not, type Win+R, and type u003cemu003eu003cstrongu003emsinfo32.exeu003c/strongu003eu003c/emu003e and in the System Information tab that opens up, you can see if the Hyper-V is enabled/active or not.u003cbru003eu003cbru003eOnce you have checked that, go to the Control Panel u003e Programs u003e Programs and Features u003e Turn Windows features on or offu003cbru003eu003cbru003eClick on the u003cstrongu003e+u003c/strongu003e beside u003cstrongu003eHyper-V u003e Hyper-V platform u003e uncheck the box beside Hyper-V Servicesu003c/strongu003eu003cbru003eu003cbru003eOnce you do this, the Hyper-V would be disabled.
What are the benefits of Azure Site Recovery?
No need to maintain hardwareu003cbru003eSince it’s in the cloud, it will be accessible from anywhereu003cbru003eThe cost would be comparatively lessu003cbru003eDeploy replication, failover, and recovery
How much does Azure Site Recovery cost?
The cost would depend upon the average number of instances that are billed. u003cbru003eIt is also free to use for the first 31 days then it is charged at $16 and $31.
Upcoming
Infrassist uploads a new blog every week. Keep an eye on our blog section to learn more about resolutions to all your technical problems.